Showing posts with label make. Show all posts

Friday, February 28, 2014

How I Made a Fascinator

What is a hair fascinator? It is a hair doodad that you wear instead of a hat. They are often trimmed with tulle and feathers. Remember you can enlarge the photos by clicking on them.
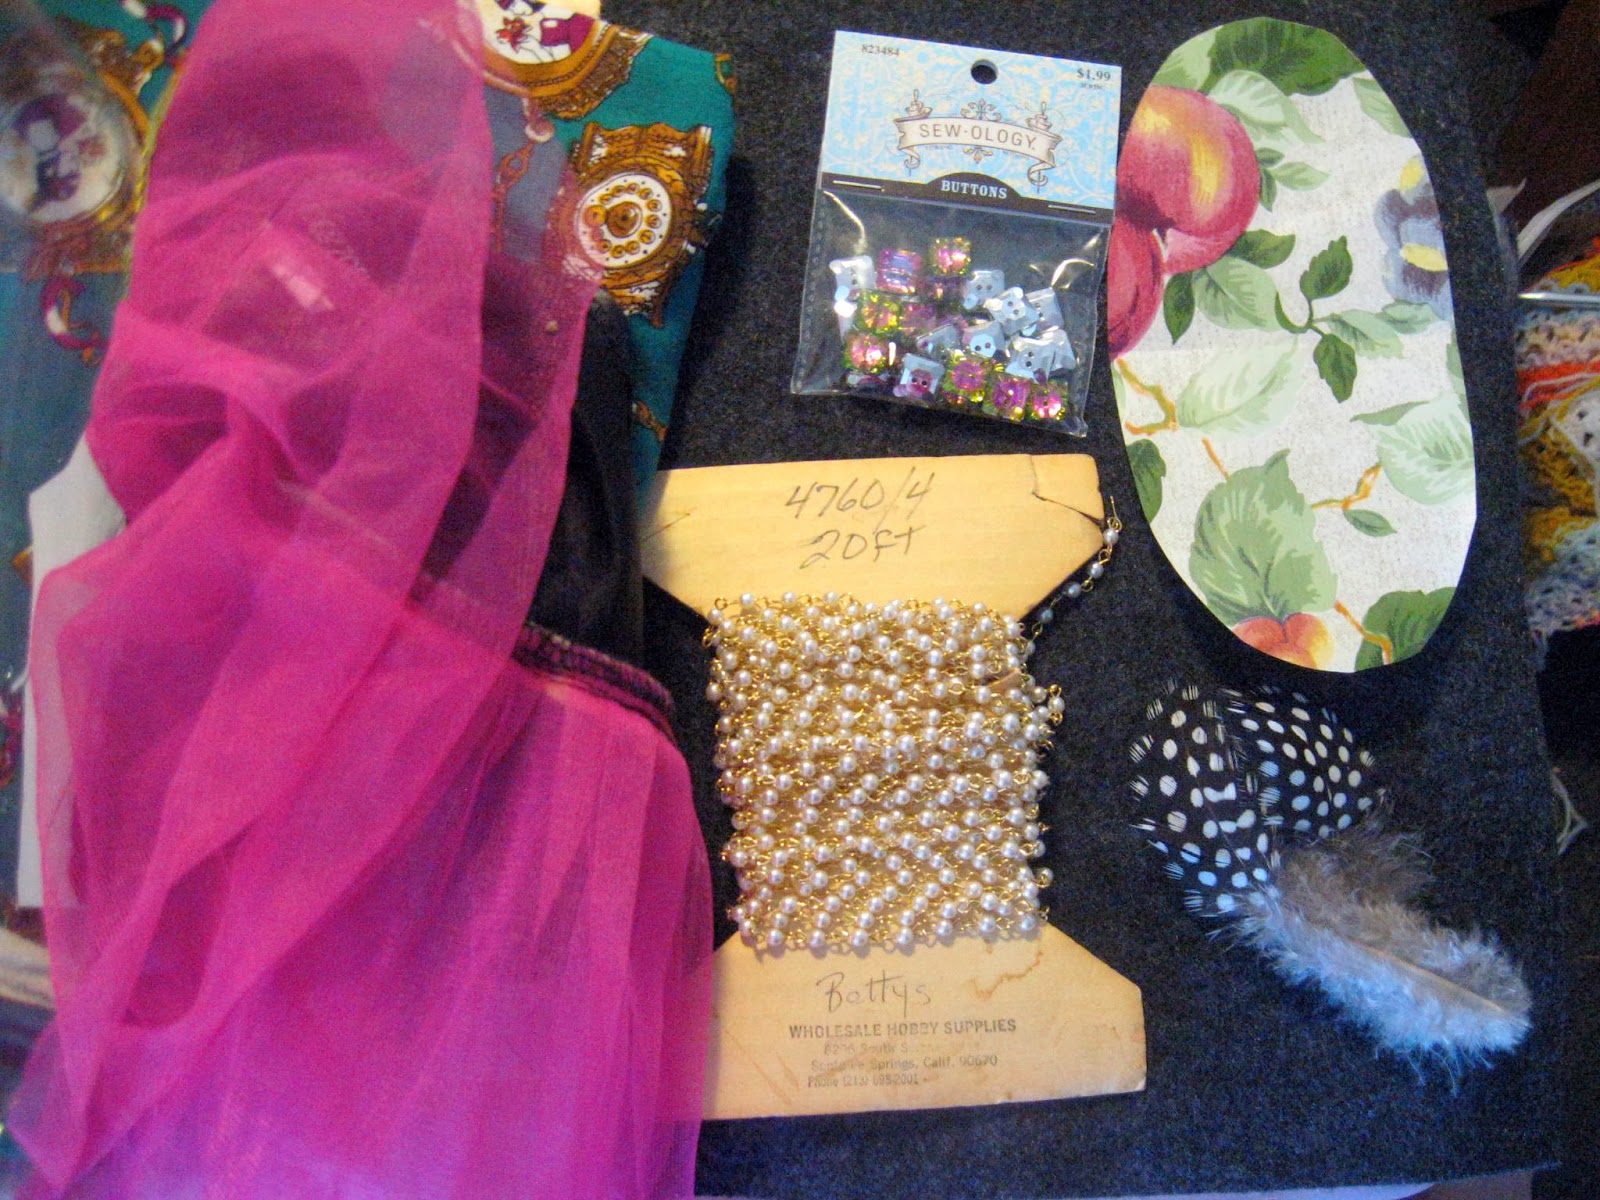
  1. First I gathered all the parts together that I thought I might need. I rinsed out and dried a 2 Liter soda bottle to make the support for the fascinator.
    From left to right: Soda bottle, fabric, pink tulle, square buttons, gray felt, contact paper pattern, feathers, and pearl trim.
    2. I cut an oval out of the contact paper. I picked this so it would be flexible. I held it against the bottle and traced around it with a Sharpie marker. Then I cut out my oval. This goes inside the fascinator and since it has a curve it fits the shape of your head. I saved the pattern to cut out the fabric and the lining. When I cut the fabric, I allowed 1/4" seam allowance. On the future ones I'll add 1/2". 
    Save the pattern for the plastic, the fabric, and the felt lining.

    Hold the pattern to the bottle and trace around it.
    Carefully cut out the oval and clean up the edges a bit.

    3. Now think of it as a sandwich. You are going to have 3 layers: Fabric, plastic center, & felt lining. Got it? I placed the fabric on top of the plastic and used a sharp needle to tack it through the plastic at both ends with a needle and thread to line it up. I recommend using a thimble. Then I ran a running stitch along the edge to get it to fold around the plastic.  Then I sewed the gold pearl and chain trim around the perimeter.

    I only sewed through the plastic when I had to. When I sewed the pearl trim on, it is 'couched' onto the green fabric; not through the plastic.

    4. The pink tulle came from a costume I bought to rip apart last Oct. I tacked that to one end, followed by the feathers and then a gold 'knot' button to cover up the ends. 
    You can still see the plastic inside the fascinator. This will be covered by the gray felt lining.

I am amused that the fabric I picked has an illustration of a woman wearing a fascinator.

Love these square buttons. I used 3 on the fascinator. They'll look great on the dance floor.


Polka dotted guinea hen feathers.
I sewed the buttons through the plastic.
5. After you sew on everything you are going to add, it's time to sew on the felt lining. Line it up carefully, tuck the cover fabric under it and sew the edges together with a whip stitch as neatly as possible. Most people would then attach it to an Alice band, but those are too small and pinchy. So I usually sew mine to 1/8" black elastic or stretch cording. If you have light colored hair you can use white or beige elastic.
Attaching the lining.

6. You can do some of the steps with hot melt glue. I live in the desert and I don't feel secure using glue. But if you needed to make a bunch in a hurry for a dance recital and they'd only be worn a few times, hot melt should be a lot faster. You can also use it to keep things from shifting before you sew them. I like hand sewing, so I sewed it all together.

Hair Fascinator by Fayme Harper from Pigglewiggins


For the photos I just used bobby pins. Now I just need someone to invite me to a cocktail party or the Kentucky Derby.

Saturday, February 22, 2014

Sand Candle From Repurposed Wax Part Two

I was so excited to dig up the candle this morning.


  1. Untie the wick from the stick. Use the stick to loosen the wet sand from around the candle. It's like digging up treasure.
  2. Brush excess sand off of candle.
  3. Now I could have either let it dry and then brushed more sand off, or rinsed it off with a hose. I used the hose and it only took a few minutes.
    I can't wait to see what it looks like!


    Loosen the sand around the candle.

    Brush off the excess sand.
    4. Trim the wick
    After rinsing with a hose.
  4.  

    5. Eventually I'll make the candle level by sitting the candle in a old warm skillet and carefully adjusting the legs.
    6. If you want to remove more of the sand, you can dip the candle in a pot of simmering water. But I like my sand candles sandy. It reminds me of the beach.

Shell detail. See the layers of pink and brown?
This is a demo photo for the blog. I'd never burn a candle this close to books.
     
Finished Sand Candle
When I level it, it will look like this.
    If you make one I'd love to see it. Put a link in the comments.  
    TIP: I collect old pots and pans for candle making and keep them in a box for that purpose. Probably best not to use your candle making pots and  pans for making food. Thrift stores and yard sales are a great place to look for old pots and pans. 

Friday, February 21, 2014

Making a Sand Candle Out of Recycled Wax Part 1


I got tired of talking about making candles and decided to just do it. I learned how to make sand candles in the 70's, and I made them again once in the 80's. So here I am again. When life gives you sand, make sand candles.

Getting the Mold Ready
Fill bucket with sifted sand.
Close up of wick placement and holes in sand made with my fingers.
  1. I filled a bucket with sifted sand. Sift it through whatever screen you have on hand. I used a bicycle basket with fine holes. 
  2. Get the sand damp. We're talking 'sandcastle' and not 'mud pie'
  3. Dig out a scoop with your hand to put the wax in. Then I poked my fingers in to give my candle 'legs'. 
  4. I took a seashell and pressed it into the side, with the part I want to show facing into the sand.
  5. Place a wick. I used a stick to loop it over so it will stay where I want it.
Wick placement.
Melting the Wax
  1. I melted my wax in a 'double boiler' set up using an old thrifted tea pot and a metal can. I should have bent the can to make a pour spout but oh well.
    Melting wax for a sand candle.
    Almost melted. Use an old fork to remove debris like old wicks or paper bits.
  2. Heat the water in the teapot over medium with the can of wax sitting in it. The tea kettle is about 1/3 full of water. Never leave wax unattended. It is flammable. So keep the heat down and keep an eye on it.
  3. I used old candle wax, two warped tapers, a few crayons, and a chunk of beeswax so the can would be almost full. As the wax melted I stirred it with an old fork. Then I fished out the old wicks and debris with the fork.
  4. I turned off the heat and let the steam settle down. Then I put a lid over it and carried it outside with a potholder.
    Carefully carrying hot wax outside.
  5. I very carefully picked up the can with tongs and poured it into the mold. Wax shrinks in the center when it cools so I knew I'd have to pour a 2nd layer.
    So far so good. You can see the seashell poking up a bit. The second pour will cover it.

    The hardest thing about making candles is having to wait to see the end result.
  6. I melted another 1/2 can of wax. Most of it was beeswax and a few crayon pieces. 
  7. I probably should have waited about 2 hours before the 2nd  pour, but I just wanted to get on with it.
    After the 2nd pour. Just the right level of wax.
Stay tuned for part 2 tomorrow to see how it turns out!

Friday, December 13, 2013

Get Stuff Done

It's crunch time for Christmas gifts. I make most of my gifts. I have a lot of things partly done. So today I have a long to-do list with a goal to get the main box into the mail tomorrow. So I have knitting and crocheting to do in order to meet that goal.

I also missed my grandson's birthday, so I need to get something together for that. And my granddaughter's birthday is early next year. I'm going to have to ask what day it is. Maybe I should go back to updating my perpetual calendar that is in an recipe box under my desk. It's a bit of a tickler file.

And it's sunny out, so I plan to spend some of it soaking up the rays, feeding the wild birds, and cleaning up the glass that broke in the windstorm.

I think we may be going to town to get a ham today too, while they are on sale. I can take my knitting along. It's almost 40 minutes of knitting time if I knit all the way there and back. Time to get off the computer and get stuff done.

The wind carried this about 400 feet in the last storm. A neighbor tore them out of his house and I was going to use them for either a cold frame or an art project. Too late now.

Monday, September 23, 2013

Beads and Sequins on an Eight Gored Skirt

I've been absolutely obsessed with a sequined 8 gored skirt I am making. It started out with sequins, then I couldn't resist adding beads. Beads might make it too heavy. And I wanted the bling of sequins. I decided to bead each panel and then sew them all together. That way the project is very portable. So I have to be careful not to sew any beads in the seam allowances.


I learned from the first panel that it's better to start in the center and work out.

Each panel will have 2 beaded flowers.

The background is a mottled navy blue, more like the last photo.

Ohh shiny!


The starting point. My needle wouldn't go through the beads so I had to tack the sequins down.
At first I didn't have a beading needle. So I dug one up and things got a lot easier. I only had enough fabric for four blue panels. If I get through those four panels of this insane project, I'll get more fabric for the other four panels, either in navy blue or black.

Thursday, September 12, 2013

DIY Ring Holder

Recently an artist I admire made a tutorial for a DIY ring holder. I knew I wanted to make one sometime but I kept forgetting to buy the sponge curlers at the Dollar Tree store. Yesterday I picked up 2 packages. I didn't know if I had a tray to put them in but I found one kicking around in a kitchen box. I had also come across some black stretch velour in my bedroom that I knew would be easy to tuck around the curlers. I used 15 large rollers, but you should use the amount that fills up your tray. Hers is much fancier, but mine will do the trick. Namely, keep my rings from getting lost and make it faster to find just the ones I want to wear. I have a bit too much wiggle room in mine, but I think it will be just the right amount once it is full of rings with different sized bands. I didn't glue anything down. That way I can take it apart if necessary and redo it. Make sure you see her tutorial first for other ideas. You can find it on her Talk2TheTrees blog.


Take the curlers off the rods and arrange in tray.


Cut a piece of stretch velour larger than you need.
Tuck excess around and between rollers.
Add your rings.

Uh oh. I may have to make another one.


Thursday, February 28, 2013

Classes and Workshops Coming Soon

I hope once I get my new house situated I'll be able to start making interesting things like soap and candles again. Not that there is anything wrong with embroidery or knitting, but people always need things like candles and soap and you can make a lot of them in one sitting.

Down the road I also hope we will make a primitive kiln for pit firing in our backyard and get the forge set up. We are also making a big burlap archery target for our future arrow making and bow making classes, hopefully in the spring and summer. If you are interested in that, by all means let us know so we can save you a spot.

Our biggest limitation is we only have one restroom. So we'll have to limit the classes to five or six people. I hope to teach gourd art as well.

Wednesday, February 06, 2013

Do You Need Some Craft Ideas?

Who wants some craft ideas? I have more than I know what to do with. Here is a list of things I haven't gotten around to yet: 1. Making roses out of fabric. 2. Making fairy doors. 3. Throwing little pots to hold beads and calligraphy water and ink. 4. Making steampunk spats. 5. Knitting house slippers. 6. Knitting yoga socks. 7. Recreating the green fairy costume I was wearing on Second Life today. 8. Making assemblages with found objects. 9. Wood-burning an ankh onto a gourd. 10. Embedding a mirror in a bread dough frame. 11. Making a mask for Mardi Gras 12. Making a mosaic on a metal table from broken tile found in my yard. 13. Drawing pin-up caricatures for use on Zazzle. 14. Make a decent knapped arrowhead. 15. Carving a spoon. 16. Making pink arrows for Valentine's Day 17. Making wooden hair forks. 18. Making corn husk or wheat dolls. 19. Making a shaggy retro 70's vest. 20. Weaving a hat out of raffia.

Thursday, January 10, 2013

A New Oddity


Yesterday I found 2 old frames and a kewpie doll. I never knew what to do with the frames so I decided to use them for my assemblage as per the Altered Oddities book I mentioned in a previous post. Then I found a gourd on my piano knick-knack shelf that I’d been saving for an elephant. So I combined them all and I’m making a Ganesh shrine with the doll body and the elephant head. I painted the frames black and I wanted to do a crackle finish on them today but when I got up this morning it was snowing. It’s going to be freezing in my work container and too cold and windy to work outside on the work table. I just hope my paints don’t freeze.

Since I’m stuck indoors I guess I’ll work on my knitting and crocheting projects instead. Or maybe some beading. And I want to spend at least an hour drawing today.

Saturday, December 22, 2012

DIY Christmas Ornament and Knitting Projects


Hello my snowflakes,

Sometimes the motivating factor in finishing a knitting project is that I want to use the needles for another project. So here I am finishing a pair of seafoam green baby booties in Woolease yarn. In storage I found my Kaffee Fasset book.  I knew I owned that book!  But I've checked it out 2 or 3 times because I couldn't find my copy. I didn't know it had been in storage for 15 years.  So I want to make a shawl that's in it that I attempted before and never finished.

I also made a Christmas ornament since I haven't found my box of Christmas decorations.  So this is my token ornament. That and a neighbor gave us a beautiful poinsettia for taking care of her cats while she's on vacation.

When I took some stuff out of storage I found some glittery chenille stems and a styrofoam ball, so I made this ball today. It took about a hour. Things went a lot faster with a decent pair of wire cutters.
It always comes down to having the right tools for the job, doesn't it!

Happy holiday crafting.

Friday, April 20, 2012

Make a Gourd Planter for Earth Day

In honor of Earth Day, I thought I'd take an old gourd that I should have used long ago, and turn it into a gourd planter. I got the idea from the Welburn Gourd Farm website, only instead of paint, I decided to add a design with my wood burner. And mine is going to be a hanging planter. It did have a pretty bad crack which I filled with a gap filling glue, so once that dries I can proceed. I should be able to finish it in plenty of time for Earth Day and post a photo of it for you.

I also recycled some cans.  On the way I spotted a yard sale.  I was able to pick up a glass bowl full of tumbled glass to use in my mosaics for $1. So that's something else I kept out of the landfill. It may be sea glass but I suspect it's just tumbled glass. The seller didn't know.

What are you doing for Earth Day?

Wednesday, February 15, 2012

Make Your Own Chalkboard Paint

I'm glad I didn't buy any chalkboard paint for the file cabinet yet, because I just lucked onto a tutorial on making your own chalkboard paint in any color you want. Not only that but she has some cool tips on making a pattern from a Chinese take-out food carton that looks like a lot of fun.  I think we might be going to the hardware store today too so I can get the ingredients. Awesome.

Sunday, February 12, 2012

Make Lip Balm

I've wanted to make lip balm for a while. I ran across directions here: Lip Balm I don't use it every day, but I do use it a lot when I'm outdoors. It would be great if I could make my own. It looks about the same as making candles or soap (melt and pour).

Thursday, February 09, 2012

Paper Valentines Cards

I spent today designing Valentine's Day cards for a tutorial. Hopefully I'll get it written and posted tomorrow because I'm running out of time. Some of them are simple enough to do with your children. Others are a bit more sophisticated, but surely there is something for everyone.
My Grandson

Puppy Love

Tuesday, July 05, 2011

Thirty Days of Crafts

I've been seriously lacking in motivation, so I thought I'd do 30 days worth of different crafts to have something in writing to look forward to and to keep me moving.  So here is the list I came up with for the next 30 days. All of these are from supplies I already have on hand. So I will have no excuses to not dive right in. If you don't lose your skills, they will get rusty. When the economy is crawling around, use that time to hone new skills.

July 5 Gourd art

6 Backstrap weaving

7 ACEO's (Art cards editions and originals)

8 Wire wrapped jewelry

9 Animal drawing

10 Embroidery on Felt

11 Thread looping
12 Sock knitting
13 Woodburning
14 Walking stick
15 Feather fascinator
16. Sock monkey
17. Macrame'
18. Acrylic on canvas
19. Sewing
20. Quilted Chatalaine

21. Art doll
22. Freeform crochet
23. Amigurumi
24. Papercrafts
25. Puppet
26. Boutonniere
27. Flower arrangement
28. Hat
29. Needle punch
30. Clay pendant
31. Faux flower pin
August 1 Tree of life pendant
2 Earrings
3 Wood egg  painting


Making a dragonfly needle punch I designed.

Thursday, November 11, 2010

I-Cord Hair Ties

I guess I can only put one embedded video per post so here is the 2nd one for hair ties.

Knitting I-cord

My two latest knitting videos are about I-cord. I-cord can be used as ties on hats, belts, packages, and also as a decorative feature on hats and clothing. It's portable and easy and you can stock up on it to have on hand for knitted, crocheted and woven projects. You can use any medium to large double pointed knitting needle or even circular needles, though that's a bit more tedious. You can use worsted weight yarn, novelty yarns, fuzzy yarns, cotton, wool, or whatever looks interesting. Have fun making your faux dreads.

Tuesday, March 23, 2010

Embroidery

I took my embroidery kit to the archery range on Sunday to work on a new t-shirt that says 'Hypnotist' on it. I'm using waste canvas to keep the text straight (hopefully). Then after the word is done I'm going to put flowers all around it in embroidery and scraps of lace and a few scattered beads.

While I had my embroidery box there, I taught my friend Paige how to do chain stitch, lazy daisy stitch, French knots, stem stitch, split chain stitch and backstitch. Learning on felt is easy on the eyes and the hands. She picked it up straight away. A few hours spent learning basic embroidery can open up a whole new world. You can use it to embellish beadwork, decorate a purse, make a headband more posh, and cover stains on things that still have a lot of wear left in them.

Or you can stitch words that express your political, religious, or anarchist views on life. The sky is the limit really. I learned when I was a kid. It's definitely something you can do if you are homeschooling too. You can embroider everything from tea towels to bloomers. And it's a blessing if you need to make a gift for someone with an unusual name when you can't find their name on anything in the mall.

Beaded embroidery