After a frantic search to see if I could find all the parts to make a mini top hat, I was able to sit outside and get going on it. I wasn't sure if I was going to be able to make it all in one sitting but I was willing to give it a try.
I first set off to find fabric in my stash. The original plan was to use a dark blue or black fabric, with peacock feathers for the trim. But when I saw this tiger print flannel, I instantly thought 'circuses have tigers'. I figured I had enough black trim to pull it off.
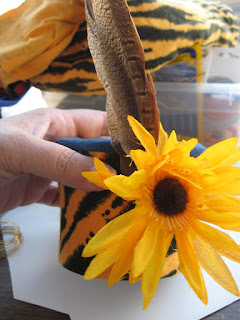
I followed the tutorial in the previous post for the most part. I did use different feathers and a faux flower. I used 2 small pheasant feathers. I wired them together with fine wire and glued them and the flower over the side seam to hide it.
I wish I'd had some black bias tape. I had to go with navy instead. At a later date I may color it with a black marker or black glitter or something. The way I look at it, is the first one is a prototype. You can't get too hung up on perfection. The goal is to learn as much as you can so the next one will be better.
The one thing I could have done better is make the fabric a bit more taut. It is sagging a bit near the top. And the tie on ribbon is cut just a wee bit short. I may have to add some elastic to each end, or another piece of ribbon. I also used single fold bias tape instead of double fold, because that's what I had on hand.
All in all, I'm thrilled to get one made. I've wanted to make one for a few years and just couldn't quite figure out how. I hope to make one for each of my daughters.
 |
| Step one: Make body of hat. |
 |
| Step 2: Glue Hat to Top |
 |
| Step 3: Put bead of glue around join. |
 |
| Step 4: Roll on fabric. |
 |
| Step 5: Glue raw age to inside. |
 |
| Step 5: Trim other edge. |
 |
| Step 6: Glue top to hat. Let dry twenty minutes and trim off excess. |
 |
| Step 7: Glue bias tape around top to cover raw edges. |
 |
| Step 8: Form brim with wire. Glue first layer of fabric to wire. Cut off excess and glue raw edges to the inside. Then cut out another fabric circle and glue to wrong side. Trim. |
|
 |
| Step 9: Measure top and bottom together but don't glue yet. Decide where
you want the cuts for the ribbon that ties it on. Cut slots and thread
tie ribbon through. Glue bias tape around rim of hat. |
 |
| Step 10: Wire feather and flower and glue along seam to hide it. Glue end of wire inside the hat. |
 |
| Step 11: Apply glue to top section. Center carefully and glue it to the flat section. Run bead of hot melt glue around join and glue hatband trim all the way around, hiding the base of the feathers and flowers. Let dry overnight. |
|
If you are confused, watch the tutorial again. This blog isn't meant to be a tutorial, but to augment the tutorial
Corinne did on Threadbanger.


No comments:
Post a Comment