Saturday, June 30, 2012

Fourth of July is Coming Soon

I'm getting excited about the upcoming 4th of July.  I should make a mini top hat for it or something. I always wait until it's too late and then I wish I'd done it. My friend Theresa used to decorate her entire house and yard every 4th of July, even painting her mailbox to match.  She had the idealic house with the white picket fence, 2 miles from a CA beach. You can do things like that when you live alone. Which I never have. I've never been rich enough to live all by myself and decorate any way I wanted to.  I'd love to live in a little witch's cottage by myself.

Now that I think about it, I made a 4th of July hair fascinator last year. I wonder if I can find it in time. Probably quicker to just make something new. 

My friend has these fairy lights in his garden. They cycle through all the different colors and are solar powered.


Friday, June 29, 2012

A Day By the Pool

Yesterday I took my crafts on a trip.  It was more or less a day with a little work and a lot of fun. I got to go swimming and try out my new bathing suit.  I got to work on crochet while my friend worked on knitting a shawl. We got to swap S.C.A. stories and philosphies. I needed a day out.  It was invigorating.

My friend is knitting a shawl.

Ice Tea before swimming.

I crocheted a new fish.
Jealous yet?

Roses in her garden.

Blue fairy light.
I crocheted this cat toy for her fur kids.

Staying warm while we had dinner by the pool with candlelight.

Tuesday, June 26, 2012

Face Painting and Random Craft Activities

I got an unexpected lift to the craft store today. How could I turn that down? 

I got the black glitter I needed.  They had glitter kits on sale for $1 each, and each kit had 4 colors, so I got 3 of them (12 colors in all). It reminded me of face painting and how much I missed it.  So if you need a face painter in or near Anaheim, it's $150 for 2 hours. I'm even available on the 4th of July if you haven't booked anyone yet. I haven't even been advertising, so I have many weekends free to book a gig.  Just leave a comment below on how to reach you.

While shopping, I got a 'calligraphy like' set of rubber stamp initials too. And I got some more lovely seashells for wire wrapping on jewelry and suncatchers.

I've been asked to teach rubber stamp eraser carving at Great Western War.  I hope that works out because it's a great opportunity for me. They don't pay their teachers, but it's great publicity if I do a good job.

Here I am in the photo reading at the library yesterday.

Sunday, June 24, 2012

A is for Archery

Saturday was a big archery event for us.  I shot my bow all day in the hot California sun.  Guy ran the Greenman Archery booth single handed. Sunday we had to rest. Here are some photos for you to enjoy.  The SCA has so many craft opportunities. Much of the clothing, archery gear, and so forth is made by hand.


Bjo Trimble is my illumination teacher and does fiber arts retreats.

New arrows by Greenman Archery

I want to make a viking dress like this and she was nice enough to pose for a photo.

Setting up an inkle loom.

Guy talks to the puppet vendor.

Thursday, June 21, 2012

Drawing With Felt Tipped Pens

Most of the time I don't like my drawings.  I never know if I should show the failures, because then I think others will know artists don't just wake up one day drawing perfect renderings. Drawing is hard, it's tedious, it's frustrating, but it's necessary. So here are my 2 drawings from yesterday. The first was supposed to be a fashion illustration. The second was a couple from a magazine page. I was real excited about the 2nd one because I liked the way the woman came out.  But I don't draw men that often, and he came out with a too small head and the mouth and teeth are just plain weird.

I don't usually draw with markers, but they are used a lot in fashion illustration so I thought I'd try at least. Plus I was drawing at McDonald's and they've gotten rid of their background music which I could tune out, and replaced it with the 'McDonald's TV channel' which drones on and on w/ local news and blurts of the McDonald's theme song. I just can't focus when there is conversation on a TV. So I'm not going to hang out there anymore. I need another place close enough to walk to.

It looks like I'm going to have to spend a lot more time drawing men.


Wednesday, June 20, 2012

Etsy Has a New Biography Page

I'm really excited about Etsy's new About page. If you have an Etsy shop I highly recommend you make one because it's fun. And useful. And has photos. Here is mine so you can see what I mean. ABOUT You can tell the world all about how you do art and why you do art. Now I need to figure out what I want on my other 4 About pages. I think maybe I will give Etsy another try

Tuesday, June 19, 2012

Library Day

Today was library day. I found a thick book called 100 Years of Fashion Illustration. I am getting lots of ideas from it so I'm declaring this week my personal 'Fashion Illustration Week." I took fashion illustration in college but got pneumonia partway through and had to drop out. I've always wanted to revisit it.

I also checked out Linda Barker's Home-made Style (100 great decorating ideas), the Simple Art of Japanese Papercrafts by Mari Ono, and Picture Your World in Applique by Margaret Cusack.  Those should keep me busy for awhile.

Then we went to Joann's and I got more craft paint and some origami paper for the Japanese Papercrafts book so I could try out some of the ideas.

Sunday, June 17, 2012

Archery and Fencing

It was a fantastic weekend. I was surrounded by creative interesting people all busy doing things they love. That makes the energy so contagious.  How many times can you see archery, sword fighting, fencing, weaving, costuming, harp playing and juggling all in one place? I took 174 photos. And that was just on Sat. I took more on Sunday but the camera is buried in the car.

On Sat. I worked on leather pouches.  I juggled for World Juggling Day. But mostly I just schmoozed with people.

Juggling for World Juggling Day
Lorenzo and Charles duel.
The front and back of the leather pouch I made on Sat.

Harpist
Jim tillering his first board bow while Guy helps mark the places that still need to be shaved.

Friday, June 15, 2012

Two Mixed Media Paintings

Here are the paintings I made yesterday and the day before. I have an 8x10 frame with glass and I thought it would be fun to frame a different painting each day.

These are both mixed media on Bristol stock. First you tape your paper down and do a watercolor wash.  Let dry completely and untape from the board. Then I drew the shapes with 2 permanent markers, one a thick point and one slightly finer. For the trees I just freehanded it.  For the 'rabbitlike' creatures, I did the pencil sketch first and kept an eraser on hand to make corrections. Then I colored them in with Crayola Crayons (TM).

This would be a great project for teens and tweeners, but younger kids might need a hand.

I sketched these bunny like creatures in my sketchbook a few weeks ago. Then when I saw the bunny-like image the watercolors had made randomly in the top center part of the painting, I knew it was the perfect background for my rabbits. It's like the great bunny spirit in the sky.
The inspiration for this was a gourd my boyfriend had wordburned a tree design onto. It was really fun to color over the background painting which made all kinds of subtle layers and nuances.

I can see this technique used for so many subjects. It has just enough randomness to keep it interesting, and enough planned art to feel like you still did some art.

Wednesday, June 13, 2012

Making Stamped Leather Necklaces

If you want to make some leather necklaces like the ones in my previous post, I explained the project here on Hubpages. It would be a great project for summer camps and homeschoolers.


Brave Archery Event in Pasadena


We had so much fun making necklaces last Sunday. I could tell some of the kids had never used a rubber stamp in their lives. Oh the things we take for granted. For an ink pad I had one made for metal. It was a deep brown color. Even though I bought it some time ago it was wrapped in plastic and super saturated. Now I'm a big fan of buying ink pads wrapped in plastic. I put brown paper on the table, so the kids could try out the stamp on the paper first before stamping it on the leather. I probably gave out 50 necklaces and only 2 came out so poorly I let the kids make another one.  Usually they thought they had to press really hard.  But leather is spongy and requires a light touch. After the child stamped the art, I punched a hole with a leather hole punch, pulled the string through with a crochet hook, made a lark's head knot, and strung a bead on each end.  I let the kids choose their bead color out of a little bowl I had made of pine needles.

Unfortunately I was too busy working to take photos of the kids making the necklaces. But here are some photos of the event.


Saturday, June 09, 2012

Stamping on Leather

It's been a busy last two days. I made 2 leather pouches, all sewn by hand.  Then at the last minute I decided to do a make and take for kid's at tomorrow's Brave archery event in Pasadena. I thought kids 7 and over could handle stamping on a bit of leather and making a necklace out of it. I was just going to make one or two stamps, and then I ended up making 6.
Cat paw print, lightning, arrowhead, star, bow and arrow, moon

The pouches are done except for some sort of fastener, and optional beadwork. I was so excited about doing a pouch demo, and then I got more excited about the kid's having something they could take home as a memento, like a necklace.  I'll still display the pouches, but I'll need to help the kid's assemble the necklaces. Unless someone volunteers to help me, but I think most of the other Paleoplanet guys are going to be working on bows.

Wednesday, June 06, 2012

DIY Mini Circus Top Hat Finished

After a frantic search to see if I could find all the parts to make a mini top hat, I was able to sit outside and get going on it. I wasn't sure if I was going to be able to make it all in one sitting but I was willing to give it a try.

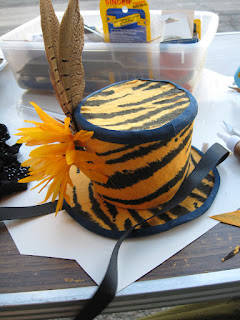
I first set off to find fabric in my stash. The original plan was to use a dark blue or black fabric, with peacock feathers for the trim. But when I saw this tiger print flannel, I instantly thought 'circuses have tigers'. I figured I had enough black trim to pull it off.

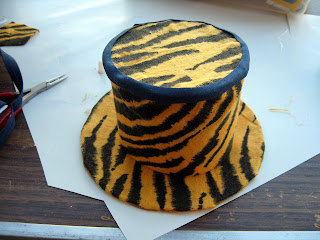
I followed the tutorial in the previous post for the most part.  I did use different feathers and a faux flower.  I used 2 small pheasant feathers.  I wired them together with fine wire and glued them and the flower over the side seam to hide it.

I wish I'd had some black bias tape. I had to go with navy instead. At a later date I may color it with a black marker or black glitter or something. The way I look at it, is the first one is a prototype. You can't get too hung up on perfection. The goal is to learn as much as you can so the next one will be better.

The one thing I could have done better is make the fabric a bit more taut. It is sagging a bit near the top. And the tie on ribbon is cut just a wee bit short. I may have to add some elastic to each end, or another piece of ribbon. I also used single fold bias tape instead of double fold, because that's what I had on hand.

All in all, I'm thrilled to get one made. I've wanted to make one for a few years and just couldn't quite figure out how. I hope to make one for each of my daughters.


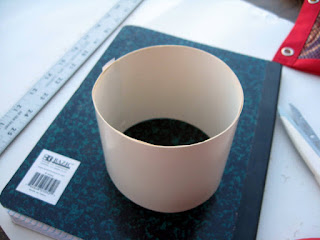
Step one: Make body of hat.

Step 2: Glue Hat to Top

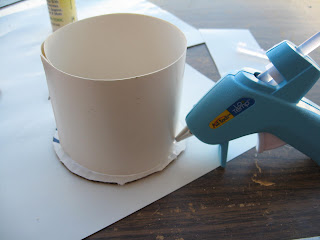
Step 3: Put bead of glue around join.

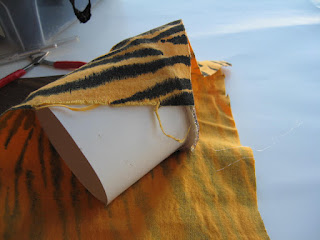
Step 4: Roll on fabric.

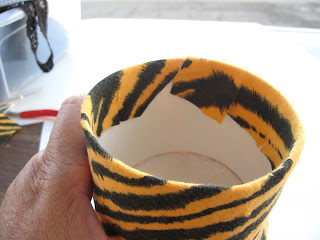
Step 5: Glue raw age to inside.
Step 5: Trim other edge.


Step 6: Glue top to hat. Let dry twenty minutes and trim off excess.
Step 7: Glue bias tape around top to cover raw edges.
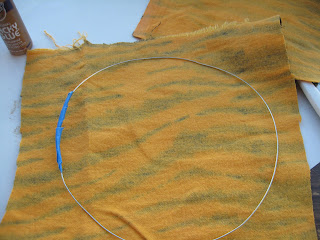
Step 8: Form brim with wire. Glue first layer of fabric to wire. Cut off excess and glue raw edges to the inside. Then cut out another fabric circle and glue to wrong side. Trim. 

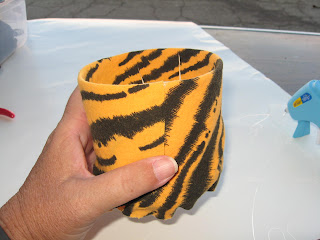
Step 9: Measure top and bottom together but don't glue yet. Decide where you want the cuts for the ribbon that ties it on. Cut slots and thread tie ribbon through. Glue bias tape around rim of hat.
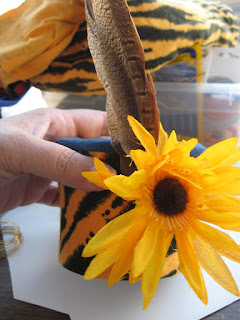
Step 10: Wire feather and flower and glue along seam to hide it. Glue end of wire inside the hat.
Step 11: Apply glue to top section.  Center carefully and glue it to the flat section.  Run bead of hot melt glue around join and glue hatband trim all the way around, hiding the base of the feathers and flowers. Let dry overnight.
If you are confused, watch the tutorial again. This blog isn't meant to be a tutorial, but to augment the tutorial Corinne did on Threadbanger.