About once every two weeks, or once a month, it's good to do a 'project rescue'. What, you may ask, is a project rescue? It's when you open your closet, drawer, or desk, and fish out a project you started but forgot to finish. This can be a novel you started, a dress that still needs sleeves, or a quilt that needs the finishing touches put on it. In some cases the project will be a lost cause, like a suit you started so long ago it will never fit you and it's hopelessly out of style, or the baby booties you were making for your pregnant sister, only now her baby is 15. If it is really too far gone, salvage it for useful bits, and toss the rest. That way you won't keep running across it every other month and feel bad about it all over again. In some cases, you've just gotten so much better at knitting or painting or ceramics, that you'd be better off making something from scratch than finishing the old thing. It frees up your energy to get rid of the old project.
Or if sorting is too painful, just put it in the donate box and maybe someone else can benefit from your 50% finished embroidery kit.

Get your daily craft fix here as I talk about the projects I'm working on. For more specifics, please visit my other blogs by viewing my profile. I will aim at posting daily unless I am out of town at a craft event or family function. ************************** Original contents including text and graphics Copyright Fayme Harper 2008-2014
Monday, July 31, 2006
Sunday, July 30, 2006
Handmade Greeting Cards
Yesterday I was at Cafe Enchante' in Huntington Beach CA and they had handmade cards for sale for $5.00 each.
Why not make your own for pennies? Most of the cards consisted of a piece of handmade paper (make it or buy it). I've made it from an inexpensive kit and a blender. Or the local art supply store carries it. A big sheet will make several cards. Then glued to the cardstock was either a small photo, or pressed flowers, or a little painting. That gives you three options of something to put on the card. Or buy a packet of flower seeds, cut four slots on the cardstock for the corners of the seed packet, and make the packet the front of the card.
I couldn't see the inside, but if you are a whiz at calligraphy, you can write whatever suits you. Or print it out on the computer in a frilly font. It's more time efficient to make half a dozen cards at once, and then stockpile them until needed.
Saturday, July 29, 2006
Stick weaving

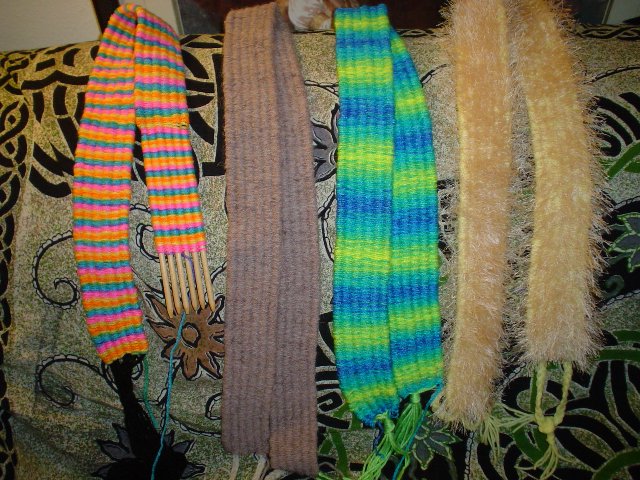
I've been struggling to figure out what kind of strap I wanted on my mandolin case, when I realized that stick weaving might be just the thing. So I fished around in some bags until I found my last stick weaving project, and lo and behold the sticks were already in a project in a yarn color that will work well with my case! And it was almost done. So ten minutes later I had the strap ready to go. All I have to do is sew it on.
Anyway here are some photos of stick weaving, a craft brought back to Europe by the Crusaders.
I made my sticks from hardwood dowels. I sharpened one end and drilled a hole in the other.
Friday, July 28, 2006
Camo hatband? Pumpkin pins?
I haven't been knitting or crocheting in this heat wave because it's just too hot. I don't even like the cats sitting with their paws on my thighs. I've been sticking to beadwork.
I went to the closing sale at the Indian Store and they were mostly sold out of colors of beads I would normally buy, but the price was right so I got some size 10 olive greenish gray czech seed beads. So now the creative wheels are spinning, and I'm thinking I could make something with a camo background. Maybe a camo hatband for archery? Maybe customized with a name on it. Hmmm. Or maybe an animal silouette in black over the camo background?
I also got all the orange beads they had left figuring Halloween would be here soon, and those pumpkins made on safety pins are awfully cute. Maybe I can whip up some of those for Etsy.
Thursday, July 27, 2006
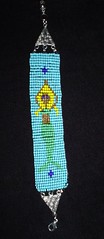
loom beaded mermaid
Here is the mermaid bracelet I designed. I just finished it. It is made with size 11 Czech seed beads.
Findings

Findings are all those little doo-dads you need to finish your jewelry and make it look professional. Here are a few that are indespensible:
1. Crimp beads and crimp tubes. These look like ordinary non-descript beads. You thread your ends through them, then through the clasp, then back through the crimp bead. Then you crimp it down (smash it) with needle nose plyers and it holds all the loose ends together. Trim the excess or thread it back through the beadwork to secure.
2. Clasps: There are many kinds but I prefer 'lobster claws'.3. Spacer beads. These feel in the gaps between different sizes of beads.
4. 3 to1 connectors. These take a wide piece of beadwork and narrow it down so you can put a clasp on it.
5. Spring rings. These have a little loop and are part of the clasp.
6. Tube bead with dangle loop. Have you ever tried stringing a pendant bead straight onto the thread and it hangs in the wrong direction? This little piece solves that dilemma.
Wednesday, July 26, 2006
Chilly Willy
How to make a chilly willy:
Supplies: Long remnant of calico (cotton) fabric.
Gel pellets from the plant nursery
Sew a tube long enough to go around your neck with a little extra to use for ties.
Be sure to leave an opening for the pellets. Sew on the ties to each end.
Scoop some of the dry pellets into the tube. Remember, they expand a great deal so don't over do it. Sew up opening.
Get your tube soaking wet in a bowl of water. The water will make the pellets swell up. Stick tube into the refrigerator for a few hours. Remove the tube and tie it around your neck for cool refreshing relief from the heat.
Tuesday, July 25, 2006
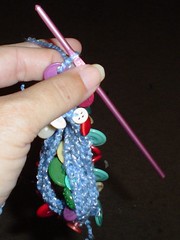
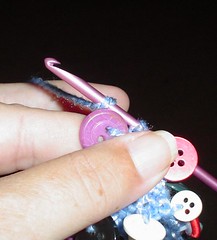
adding a button part 2
Then pull yarn through. Now there is one loop on the hook that secures the button.
Monday, July 24, 2006
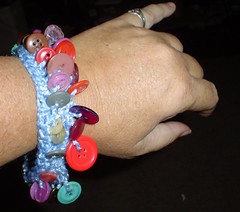
Crochet a button bracelet.
Thread the buttons you want to use onto your yarn. It's nice to have a yarn with some stretchiness to it, like some of the sock yarns with a touch of nylon. Keep adding buttons until you have as many as you think you'll need, then slide them down the yarn and out of the way. Nestle them up against the skein. Chain stitch long enough to make a strand as big as your wrist. Join to form a ring. Single crochet in the 2nd chain from the hook. Do two or 3 more SC's. Now, slide your first button up where you want it. (see photo) Grab the next bit of yarn with your hook, as if the button isn't there, and make another stitch. This will hold the button on. Make another single crochet to hold it in place. Add a button, add a SC, add a button, add an SC. When you get to the end of the round, chain 1 to step up to the next round and start a new round. Do a whole row of SC to anchor everything. Chain one, start the next row, once again doing a sc, then add a button, then add a sc. and so on. In other words, add the buttons every other row. Repeat until the bracelet is as wide as you want it. Add one more row of single crochet if you want, then tie off and weave in ends.
This bracelet has 2 rows of buttons (about 40 total).
This bracelet has 2 rows of buttons (about 40 total).
Sunday, July 23, 2006
Mandolin case from denim.
I've decided to use some of my recycled denim to make a soft case for my mandolin. First I put three pairs of jeans in the washer and added bleach during the spin cycle to give them interesting white blotches. Using bleach is risky, so adult supervision is a good idea.
Then after they were dry, I cut apart the cloth from the seams. I'm keeping all the parts until I know for sure if I need them or not. Next I have to trace around my mandolin to make a pattern. I'll have to give my older sister credit here because back in high school she made a guitar case out of my dad's old air force fatigues. She used the button placket as the opening to unbutton it to get the guitar out. Very clever.
Then after they were dry, I cut apart the cloth from the seams. I'm keeping all the parts until I know for sure if I need them or not. Next I have to trace around my mandolin to make a pattern. I'll have to give my older sister credit here because back in high school she made a guitar case out of my dad's old air force fatigues. She used the button placket as the opening to unbutton it to get the guitar out. Very clever.
Saturday, July 22, 2006
Artist Trading Cards
Also known as ATC's. The idea behind them was to make a card the same size as a baseball card to trade, only to have it be original art. An ATC is 2 1/2" x 3 1/2". Some people actually use playing cards as the base. This is a repost of some art tips I made to an ATC group on Flickr.
Useful tecniques:Whenever you are getting paper wet, it will want to curl up. The solution is to use drafting tape to tape it to a drawing board first. The tape will leave a clean border around your card. Or if you don't want a border, cut the paper big to begin with and trim off the border later. I find it easier to start with a big sheet of watercolor paper (like 11"x14" and tape it down. Then make many cards at once (however many will fit on the sheet). When dry, remove the tape and cut to size.
Improving the base:I can't imagine using white-out when acylic gesso is so much more efficient and less expensive in the long run. Check the prices...sometimes the bigger bottle is a lot better deal than the smaller sizes. Save time by adding paint to a small bit of gesso to avoid the white background phobia. I barely mix mine so that each stroke is a different shade. I find it more painterly that way.
Don't waste paint:When you have all that excess paint on your pallette and you are done for the day, you can cover it with foil or plastic wrap. If you have no use for it because you finished your project, grab you sketchbook with the heavy weight paper that you use for your artist book/journal and flip to a blank page and use the excess paint as a background for a future art page. If you lay the book flat you can paint two pages at once. I always slip a piece of thin cardboard under each page so the paint won't seep through to the other pages. Leave open until dry. Or sometimes I use the extra paint to put a background coat on stones for gypsy stones (the found art I give away). I have a box full of clean stones ready to go. Have fun.
Friday, July 21, 2006
Recycled denim
Has anyone else noticed people are starting to use the term 'repurposed' instead of 'recycled'. I wonder how that got started. Maybe someone could tell me.
Anyway, I saw a real cute journal cover made of used denim and I started thinking of all the things I could make from old denim. I wanted to make a distressed denim skirt in the worst way, but I think I'd look like a blue elephant in one. So now I'm thinking of things like purses, hats, bookcovers and other small projects.
Anyway, I saw a real cute journal cover made of used denim and I started thinking of all the things I could make from old denim. I wanted to make a distressed denim skirt in the worst way, but I think I'd look like a blue elephant in one. So now I'm thinking of things like purses, hats, bookcovers and other small projects.
Thursday, July 20, 2006
Project Notes
I can't emphasize enough that it's worth it to take time to make project notes. Case in point, the post below. It took me over an hour to figure out how to continue on. That's because I didn't write down the order of the beads to make the pattern. If I'd made any notes at all, they'd been seperated from the project bag. I finally figured it out, and this time I wrote it down.
Interruptions are a fact of life. We sometimes assume that if we get started with great fevor for a project, we'll get it done in a reasonable length of time. But life has a way of intruding. Between unplanned moves, unexpected company, unexpected illnesses and sudden trips, it's a wonder we get anything done. Even five minutes worth of notes can be priceless later.
Interruptions are a fact of life. We sometimes assume that if we get started with great fevor for a project, we'll get it done in a reasonable length of time. But life has a way of intruding. Between unplanned moves, unexpected company, unexpected illnesses and sudden trips, it's a wonder we get anything done. Even five minutes worth of notes can be priceless later.
Wednesday, July 19, 2006
Beadwork, Peyote Stitch

Peyote stitch, also known as gourd stitch, can be worked around a tube or a cylinder. I started covering the cordage of some eyeglass holders a while back and just unburied it today. I have forgotten the specifics, so I'll be off hunting for instructions on 4 color peyote stitches.
I think this will do the trick: http://www.beadjewelrymaking.com/Arts_and_Craft_Idea/peyote_stitch_instruction.html
Tuesday, July 18, 2006
Make a container
The lists of things you can make containers for is exhausting. Here are just a few.
1. War chest...hand carved wooden chests are popular for reinactments to stash all your gear in. Whether you are a pirate of a viking, you have to stash that booty somewhere.
2. Purses/Pouches
The options are limitless. You can make these out of fabric, leather, gourds, chainmaile, wood, metal, or found objects. Sporran pouches have even been made out of badgers.
3. Needle cases
Make them out of felt to hold needles, or make wooden tubes to hold needles. Or buy the tubes already made from the needlepoint shop and paint them yourself with cool designs.
4. Knit or crochet containers. This includes purses, pouches, bowls, boxes, and roll-up jewelry cases.
5. Needlepoint is famous for adding a decorative touch to containers, whether they hold a tennis racket or eyeglasses.
6. Use clay to make a container. You can make a vase, or a wall sconce, or a bowl out of clay. There are many clays on the market from the kind needing a kiln to the kind you let dry in the sun.
7. Make little containers to hold jewelry, cards, dice, pet rocks, ID cards, buttons, beads, or touchstones. All those cool things you don't want to break but you need to keep in a safe dark spot until you need them.
8. Make giant containers to hold books, tripods, sleeping bags, bows, guitars or laundry. We bought a roll of canvas at a good price a few years ago and out of it we've made bow socks for archery, a pavilion, banners, tool caddies, and many other things. The beauty of canvas is you can paint right on it or dye it. It helps to have a serger to keep edges from raveling.
9. Make the container part of the gift. Instead of giving someone a deck of tarot cards, give them the cards in a personalized beaded pouch. Instead of giving your gamer a handful of dice, make a leather pouch just for them. Embroider a dragon or their favorite animal on it.
10. Stores abound with things you can turn into cool containers. You can buy little paper boxes to decorate with paint, beads or decoupage. You can get little tins at any of the bargain stores. Just eat the mints and the container is basically free. Many people pitch their gift boxes after a holiday. If you ask people to save them for you, you'll soon have more than you could ever use.
Sometimes tea comes in great little wooden boxes. My first choice is wood, then metal, then cardboard, then plastic. Get in the habit of reading paint and glue containers to make sure all the items are compatible. Then craft away.
Monday, July 17, 2006
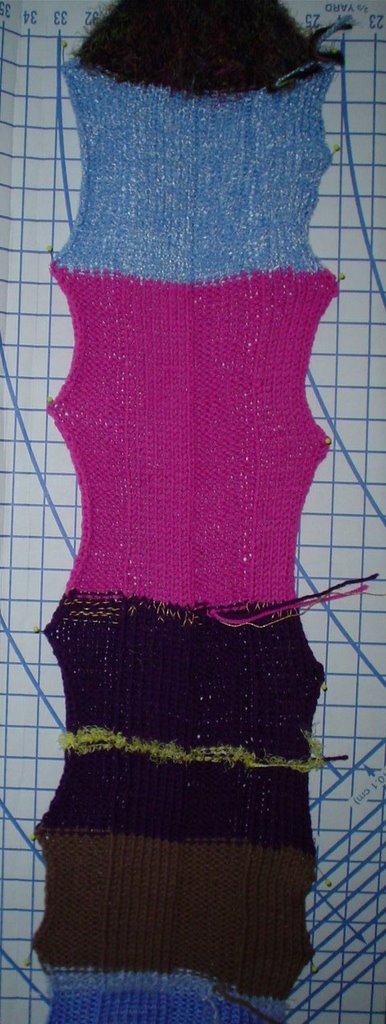
Modular Knitting
Knit dress front panel before blocking.
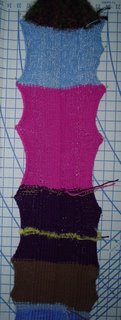
Most people are familiar with the concept of patchwork quilts. You take squares, rectangles, triangles and other geometric shapes and piece them all together like a jigsaw puzzle.
Modular knitting works the same way. Save up all those knitting swatches and half-finished scarves. Pick a garment or a purse that is made of simple geometric shapes, and start pinning the various shapes that you have in your stash to the pattern.
Right now I am making a dress. The front panel is striped ribbing. The back panel is stockinnette stitch. They are multicolored. Then I will make the sides and sleeves out of black.
Sunday, July 16, 2006
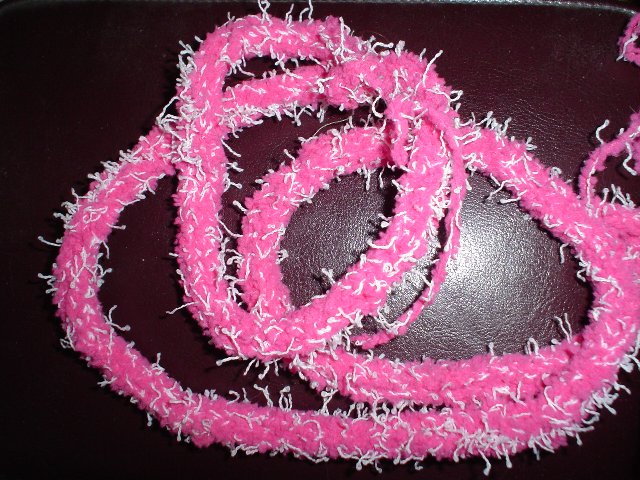
Learn Freestyle Crochet
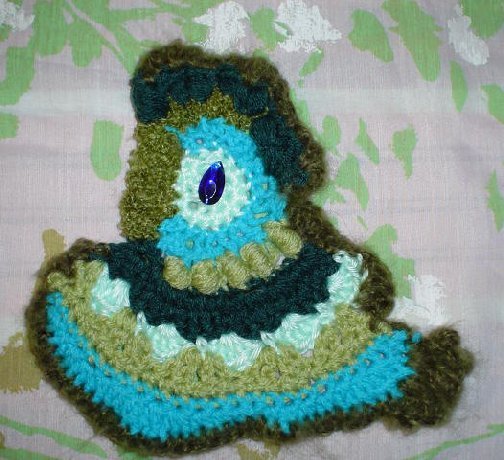
Patterns gotcha down? Tired of following in someone else's footsteps? Why not grab some yarn, your favorite hook and take off blazing your own trail. Here's a photo of a 'scrumble', a bit of freeform crochet I made up as I went along. Once I get enough of these made, I'm making a mermaid belly dancing costume out of them. Want to see more scrumbles? Go to Google images and google up scrumble and scrumbles.
Saturday, July 15, 2006
Polymer Clay Push-molds
I've been waiting for weeks for Michael's to put Sculpey on sale. Today it was .99, half the usual price. A few years ago I made some faces with a commercial brand push mold. Recently on line I read an article on how to make your own original push mold, so I've wanted to do that for years and I had to jump on the chance.
I can't find the site now, but here is another one: http://www.jaedworks.com/clayspot/polyclay-faq/molding.html
I can't find the site now, but here is another one: http://www.jaedworks.com/clayspot/polyclay-faq/molding.html
Friday, July 14, 2006
Painting with acrylics
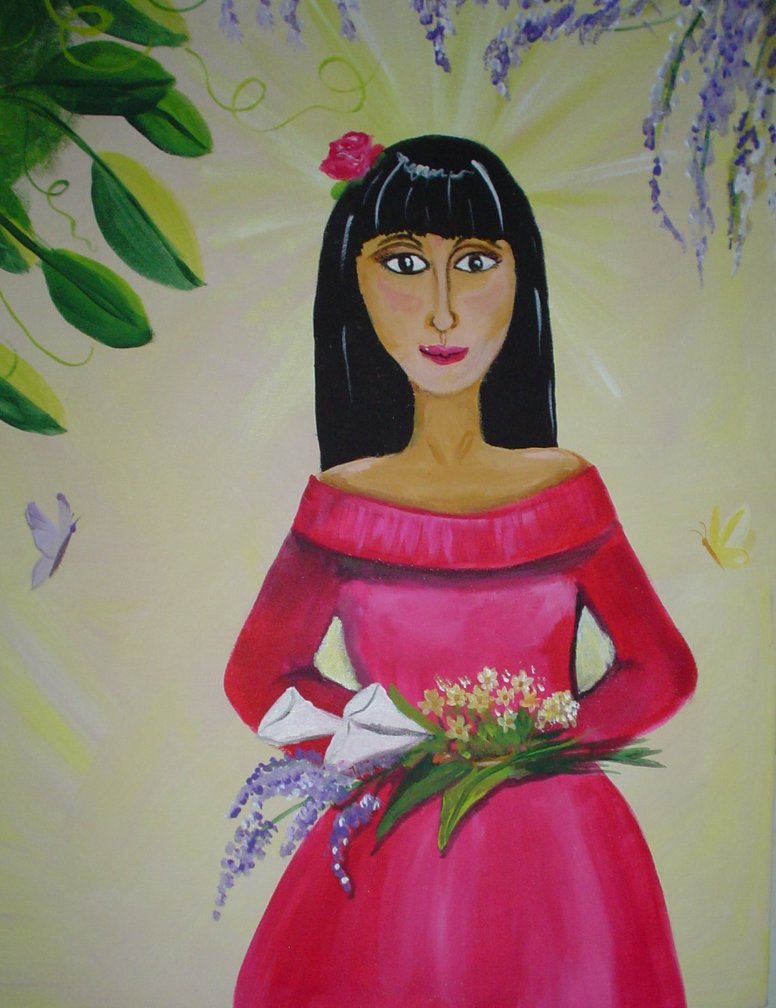
If you've never painted with acrylics before, you are in for a pleasant surprise. They smell a whole lot better than oil paint and turpentine, and they dry quickly, making them an excellent choice if you have children that like to put their hands on everything. This is an acrylic painting on gessoed canvas. I save time by adding some paint directly to the gesso and pre-painting the background. The rest of the painting I worked on this morning; quit when it got hot outside, then worked on it again as the sun was going down. With any luck, I'll finish it tomorrow. I need to paint more leaves and figure out what to put in the lower left hand corner.
Thursday, July 13, 2006
Wednesday, July 12, 2006
Amigurumi Circus Elephant
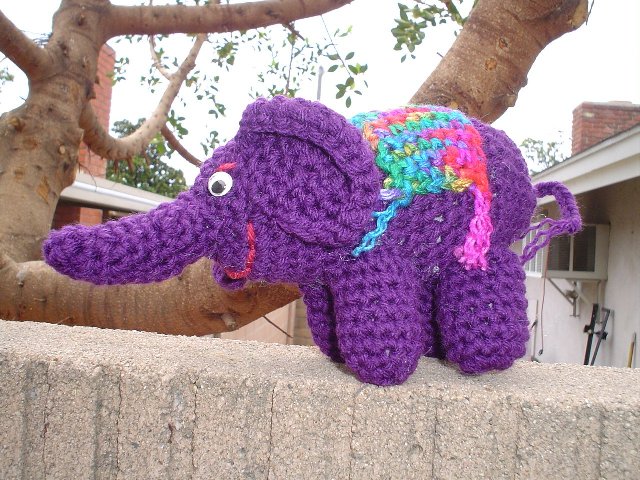
If you know how to crochet the basic single crochet stitch and you know how to increase and decrease, you can design your own amigurumi projects. Amigurumi originated in Japan and is a way to make small animals, and 'things' like cupcakes or sushi. The debate is on-going about whether amigurumi includes knitting too. But if you are more adept at knitting, why not knit one. Anyway, here is one of mine.
Tuesday, July 11, 2006
Sundancer beaded doll.
 Here is a beaded doll made from leather. When doing beadwork on leather have some pliers handy to help you pull the needle through the leather. It sure saves wear and tear on the hands. A thimble comes in handy too. Make sure you pick a needle small enough to go through all the beads you plan to use. This photo was taken when I was about halfway done. I used mostly warm colors to represent the sun/summer/heat and some sky blue beads to represent the sky. The face is made from carved bone.
Monday, July 10, 2006
Doodling as therapy
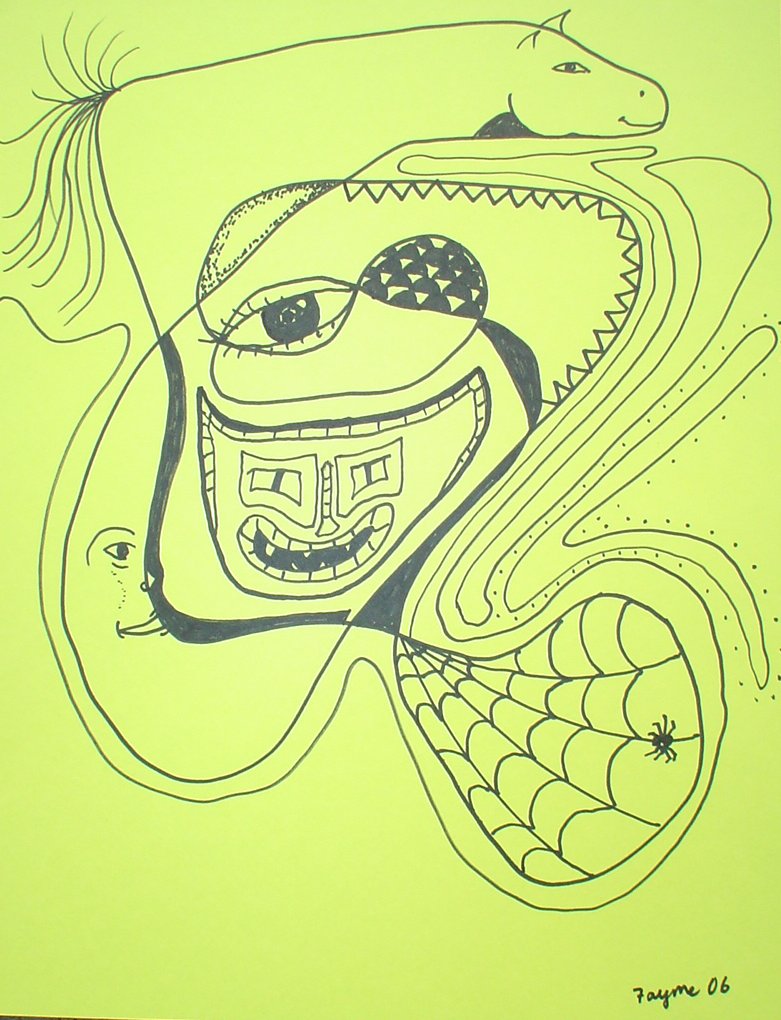
Sharpie Fine Point on Card Stock
This morning I was cleaning out a notebook and found a flyer for a doodling workshop long passed. But her website was listed so I wanted to share it with you. http://www.sacreddoodles.com/pages/artworks.htm Scroll down on that page for the doodle directions. When I finish my doodle I'll post it here.
I made a new flickr group just for doodles over here: http://www.flickr.com/groups/oodlesofdoodles/
It's free to join so come on by.
Sunday, July 09, 2006
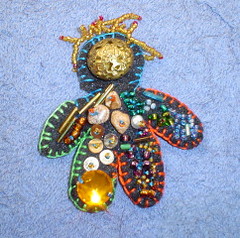
Art Doll Pin
The body is made out of felt. Felt is a joy to work with as the needle passes through it easily. The edges are joined with blanket stitch. After the doll is finished, I sew a pin to the back so it can be worn as jewelry.
Saturday, July 08, 2006
Dead Men Tell No Tales

Working on the beading loom. So far so good. I have to take a break every 30 minutes or I start making mistakes. Made with size 10 Czech beads.
Friday, July 07, 2006
Creative hair dreads
 I designed these hair 'dreads' to be braided into my hair. I have another one with seashells woven into it. They are made by knitting in a method called I-cord which is short for idiot cord, as in 'any idiot can do it.' If you don't know how to make idiot cord, google it up as there are many websites that have the directions.
Thursday, July 06, 2006
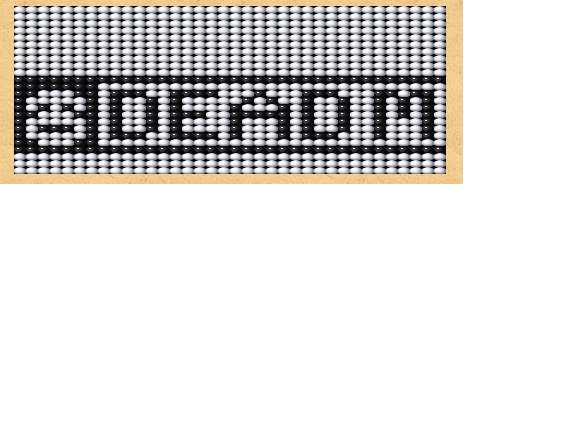
Loom Beading

Today I'm relearning loom beading. This page has been helpful in designing: http://www.nativetech.org/beadwork/beadgraph/index.html
especially since my friend taught me how to do a screen capture and save it to my paint program and print it out.
My first design is a skull choker that will say "Dead Men Tell No Tales" to commemorate the release of Pirates of the Carribean 2 tonight. I'm going to go see it at a special showing tonight at midnight.
I started the beadwork last night but I made some mistakes and started over with a better chart.
I'm using size 10 Czech seed beads and a big eye needle. I prepared the loom with D beading thread and I am using B thread for the beadwork. Those recommendations were given to me by the clerk at the Indian Store and they seem to be working very well.
In the past I've had poor results with uneven beads, so now I'm careful to discard any lumpy beads. I can use them for other projects that don't require so much accuracy to look right.
Welcome
Welcome to my craft-a-holic life. I know many people have told me they just don't get good craft ideas. I have the opposite problem...more ideas than I can ever hope to create in my lifetime. Hopefully as I share some projects it will trigger your own creativity and you'll be off on some of your own great craft adventures. Here is a list of some of the crafts I've done over the years and that might be included in the daily postings:
needlepoint
knitting
crochet
painting on glass
gourd art
ceramics
beadwork
costuming
sewing
collage
decopage
scrapbooking
papermaking
pyrography
carving
leathercraft
dyeing
soft sculpture
art dolls
sock monkeys
quirky sock critters TM
gardening
puppetry
needlepoint
knitting
crochet
painting on glass
gourd art
ceramics
beadwork
costuming
sewing
collage
decopage
scrapbooking
papermaking
pyrography
carving
leathercraft
dyeing
soft sculpture
art dolls
sock monkeys
quirky sock critters TM
gardening
puppetry
Subscribe to:
Posts (Atom)